How to backup Zoner Photo Studio 9 settings?
Many times it happens that after purchasing photo software and you find something missing in it, but you will find nothing missing in Zoner Photo Studio 9. With Zoner Photo Studio 9 Professional version, you get a software application program which is all in one that helps you from acquiring the photos readying them for use till sharing them. If you have many images which needs to be edited using the same setting and at the same time if you have to format your PC then using this software there is no need to take the settings as there is provision made in this software using which you can take the backup of your settings as well.
System Requirements
- WINDOWS 2000/XP/ME/98
- MS Internet Explorer Browser 5.0 and above.
- Processor compatible to Intel (Speed More than 300MHZ)
- RAM 128MB
- Hard Drive Space of 80MB
- Monitor having high color resolution (800 * 600)
Backing up Zoner Photo Studio 9 Settings
Step 1
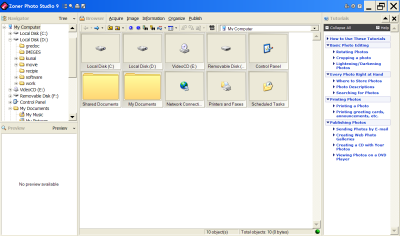
Double clicking the Zoner Photo Studio 9 icon the window of the software is opened the window is as shown in Fig. 1;
Figure 1- Zoner Photo Studio 9 Window
Step 2
You can see the available folders and partition in your PC from where you can directly open the required photo to edit, you don’t have to follow the traditional path from File>Open.
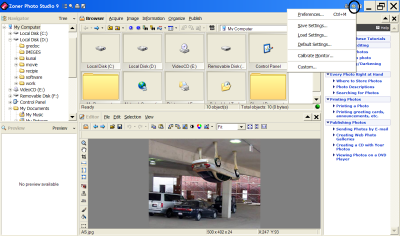
Open your photo and apply the settings that you want for editing the image. In Zoner Photo Studio 9 window you can view a setting tool icon encircled in Figure 2. After clicking the icon you will get a drop down box as shown.
Figure 2- Settings Drop Down Box
Step 3
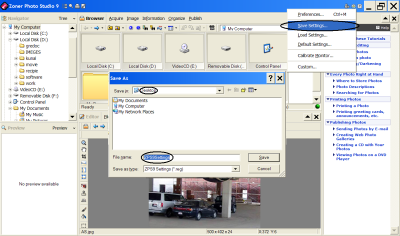
In the Settings drop down box, select the option save settings and you will get Save As window there. Now you have to select the target folder to save your backup settings for image editing (Desktop Recommended as searching the file is made easy). Refer image below to save your backup setting.
Figure 3 – Save Your Settings
How to restore Backup Setting?
Restoring the data is quiet simple, you just have to double click on the file and the settings are restored.


