How to create custom backup mage for Windows 8 Refresh PC feature
Windows 8 offers many new features. Regarding the backup there is a nice option to set the system to the state after the installation. Using Refresh PC you can bring back the stable system state without modifying your data. There is also a special trick to create custom image to be used via Refresh PC in Windows 8.
Windows 7 and older versions had a feature of Restore Points. Windows 8 comes with a new concept. We can use Refresh PC or Reset PC functions. Both of them brings your computer to the state after the Windows 8 installation. So if anything will go wrong, you can any time switch to the stable state.
The difference between Reset PC and Refresh PC is, that the first one will delete your data while the Refresh PC keeps them untouched.
I think Windows 8 Refresh PC is very useful. A few days back I needed to try it in practice when something went wrong with my Visual Studio installation. But to make the Refresh PC in Windows 8 really useful, you need to set up your custom backup image which will be used when refreshing your computer.
By default, Refresh PC will brings you back to the state after the Windows 8 installation. This could be fine, but more often you will need to come back to the state with all your favourite apps installed and working without a problem. So this is the reason to create a custom backup image for the Windows 8 Refresh PC feature.
Custom backup image for Windows 8 Refresh PC
Using the Refresh PC in Windows 8 is simple. Just go to the Start screen, move to the right and click the Settings. Then More PC settings. Continue to the General section and click the Get started button for the Refresh PC.
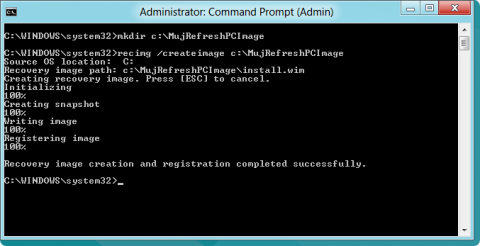
Creating your own custom backup image for Windows 8 Refresh PC can be done using these steps:
- Hit Win+X keystroke and from the menu run Command Prompt - Admin
- Create a new folder for your backup image - mkdir c:\myrefreshpc
- Create a new image using the recimg /createimage c:\myrefreshpc command
Creating custom image for Windows 8 Refresh PC
Now your custom backup image for Refresh PC is done. Windows 8 will automatically pair the latest created image with the Refresh PC function. You can also create more backup images and switch between them using the two commands:
- recimg /deregister
- recimg /setcurrent path-to-the-image-folder

